Technology and troubleshooting.

Friday, November 11, 2016

Determining if ip address is already in use for device eth0 Centos

This tutorial describes how to fix determining if ip address is already in use for device eth0 while configuring the networking and do a network restart this error may occurred.


root@techlanda ~# service network restart Shutting down interface eth0: [ OK ] Shutting down loopback interface: [ OK ] Bringing up loopback interface: [ OK ] Bringing up interface eth0: Determining if ip address 10.26.112.35 is already in use for device eth0... Determining if ip address 10.26.112.35 is already in use for device eth0... Determining if ip address 10.26.112.35 is already in use for device eth0... root@techlanda ~#


Solution:- Something on the network is replaying that difference MAC address that one cause this error message Determining if ip address is already in use for device eth0. 
Just add this to your interface eth0 file.
ARPCHECK=no

root@techlanda ~# find /etc/sysconfig/network-scripts/ -name ifcfg-eth0\* -type f -exec sh -c 'echo ARPCHECK=no >> $1' -- {} \; root@techlanda ~# cat /etc/sysconfig/network-scripts/ifcfg-eth0 DEVICE=eth0 BOOTPROTO=none NM_CONTROLLED=no ONBOOT=yes TYPE=ethernet NETWORK=10.26.112.0 NETMASK=255.255.255.0 IPADDR=10.26.112.35 ARPCACHE=no root@techlanda ~# service network restart
Shutting down interface eth0: [ OK ]
Shutting down loopback interface: [ OK ] Bringing up loopback interface: [ OK ]
Bringing up interface eth0: [ OK ]
root@techlanda ~#

I hope this information is useful for you. Please forgive any typos or incomplete sentences.

Share:

Tuesday, November 8, 2016

How to fix Excel PasteSpecial grayed out

This tutorial describes how to fix Paste Special, Cut, Copy grayed out issue. This type issue may occurred while open the incompatible excel file which contions marco or working with ITR related excel sheet.


Excel PasteSpecial grayed out
Solution:-
Step #1
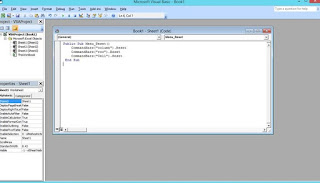
Right Click the Sheet1->Open View Code-> Microsoft visual basic wizard will open
View Code
Step #2 
Paste the below the code in the code editor and HIT Enter


Public Sub Menu_Reset()
    CommandBars("column").Reset
    CommandBars("row").Reset
    CommandBars("Cell").Reset
 End Sub

code editor
That's all above code will reset to excel configuration to default.

I hope this information is useful for you. Please forgive any typos or incomplete sentences.
Share:

Monday, October 17, 2016

How to Enable SSH Root Login in Debian 8

This tutorial describes how to enable ssh root login in debian 8 jessie. Why by default root login is not enabled in debian based operating system answer is simple Security reason. If the ssh is enabled for root users your system will be easily compromised by brute force attack

!!!Warning:- Enabling SSH root login is not recommended in production Environment.
Enable SSH root login on Debian Linux Server
My Scenario:-  There are some particular instances root login comes handy one such situation i faced was when convert the Physical Debian box into Virtual Environment.

Error:- 
login as: root
root@192.168.20.101's password:
Access denied
root@192.168.20.101's password:
Access denied
root@192.168.20.101's password:
Access denied
root@192.168.20.101's password:

Step #1
Login into Debain system using user account you had created earlier and switch to root user using "su".
superuser@GNS3-Test:~$ su
Password:[Your root password]

Step #2
root@GNS3-Test:/home/superuser# vi /etc/gdm3/daemon.conf
How to Enable SSH Root Login in Debian 8

Under security add “AllowRoot=true”. So your security section in the file should look like this:[security]

AllowRoot=true 
Once it looks like this save the file then exit the window.
Step #3 

root@GNS3-Test:/home/superuser# vi /etc/pam.d/gdm-password
comment this line "auth required pam_succeed_if.so user != root quiet_success"
#auth required pam_succeed_if.so user != root quiet_success
Step #4
root@GNS3-Test:/home/superuser#service ssh restart
â ssh.service - OpenBSD Secure Shell server
   Loaded: loaded (/lib/systemd/system/ssh.service; enabled)
   Active: active (running) since Mon 2016-10-17 16:25:04 IST; 11s ago
  Process: 896 ExecReload=/bin/kill -HUP $MAINPID (code=exited, status=0/SUCCESS)
 Main PID: 1431 (sshd)
   CGroup: /system.slice/ssh.service
           Ã¢Ã¢1431 /usr/sbin/sshd -D

Oct 17 16:25:04 GNS3-Test systemd[1]: Started OpenBSD Secure Shell server.
Oct 17 16:25:04 GNS3-Test sshd[1431]: Server listening on 0.0.0.0 port 22.

Oct 17 16:25:04 GNS3-Test sshd[1431]: Server listening on :: port 22.

Now you should able to login root account through ssh 

I hope this information is useful for you. Please forgive any typos or incomplete sentences.

Share:

Tuesday, September 13, 2016

Rename local Administrator account via GPO

This tutorial describes how to rename the local administrator account via GPO. Why we need to rename the Built-in administrator account?
The Built-in Administrator account is one of the most targeted account easily guessed by anonymous person that are attempting to access your computer with full privileges.

Rename local Administrator account via GPO

Let's move on to the tutorial.
All the screenshots are taken from Windows 2012R2 and Windows 8.1 Client.

Step#1 Open the gpmc.msc 
how to open gpmc.msc
Step#2 Group Policy Management console Create a new policy and its named as Rename local Administrator Account for future reference.
[Your Domain]==>Group Policy Objects==>Right click New==>Name[Name for your Policy]

Create a new policy for rename local administrator account
Right click and Edit the newly created policy Rename Local Administrator Account.
Edit a new policy for rename local administrator account
 In Group Policy Management Editor Elapse==>Computer Configuration==>Policies==>Windows Settings==>Security Settings==>Local Policies==>Security Options==>Accounts: Rename administrator account==>Right Click Properties==>Check Define this Policy Settings checkbox==>Rename local Administrator name"Poweruser"
Edit a new policy for rename local administrator account
Step#3 Link a rename administrator account policy to Computer OU
link rename local administrator account for Computer OU
Step#4 Update the group policy in client computer.
RUN==>gpupdate /force refresh the lusrmgr.msc changes.
renamed local administrator account
I hope this information is useful for you. Please forgive any typos or incomplete sentences.
Share:

Monday, September 12, 2016

How to fix WAMP is not working on IIS installed machine

This tutorial describes How to fix WAMP is not working on IIS installed machine.

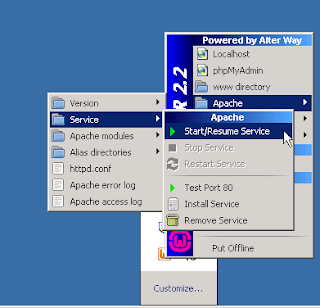
My Scenario:- My teammate informed me can you please check why WAMP service is not started?  I found the issue is caused by recently Installed IIS Web service on WAMP Server installed machine.

Troubleshooting:-
I logon the WMAP the sever type localhost on the browser it navigate to IIS default page.

IIS Default Page
Issue identified, IIS and WAMP Service are listing the same port (Port 80) to run Web Service. So i decided to change the listing port for WAMP Service in order to run WMAP service. 

Resolution:- How to change WMAP Listing Port:- 
Step#1 Travel to "C:\WAMP\bin\apache\Apache2.2.21\conf" directory.
WAMP Directory

Step#2  Open the httpd.config using text editor.
Step#3 Find the line Listen 80 in the httpd.conf file and change it to  "Listen 8080" (or assign any port which is not in use).


change wamp port Listen 8080

Step#4 Start the WAMP Service it will start working using Port 8080.
start wamp service

I hope this information is useful for you. Please forgive any typos or incomplete sentences.
Share:

Sunday, September 11, 2016

How to fix metasploit failed to connect to the database

This tutorial describes How to fix metasploit failed to connect to the database in Kali Linux2.0 Sana .

My scenario:- Today i did some experimental with Kali Linux Sana. I tired to connect metasploit database with postgresql it failed to connect database these is the error i got during experimental.
Error:-
root@kali:~# service postgresql start
root@kali:~# service postgresql status
postgresql.service - PostgreSQL RDBMS
   Loaded: loaded (/lib/systemd/system/postgresql.service; disabled)
   Active: active (exited) since Sun 2016-09-11 16:44:35 IST; 48min ago
  Process: 6448 ExecStart=/bin/true (code=exited, status=0/SUCCESS)
 Main PID: 6448 (code=exited, status=0/SUCCESS)
   CGroup: /system.slice/postgresql.service
root@kali:~# service metasploit start
Failed to start metasploit.service: Unit metasploit.service failed to load: No such file or directory.


  root@kali:~# msfconsole
                                                  ole.../
# cowsay++
 ____________
< metasploit >
 ------------
       \   ,__,
        \  (oo)____
           (__)    )\
              ||--|| *


Save 45% of your time on large engagements with Metasploit Pro
Learn more on http://rapid7.com/metasploit

       =[ metasploit v4.11.4-2015071403                   ]
+ -- --=[ 1467 exploits - 840 auxiliary - 232 post        ]
+ -- --=[ 432 payloads - 37 encoders - 8 nops             ]
+ -- --=[ Free Metasploit Pro trial: http://r-7.co/trymsp ]

msf > db_status
[*] postgresql selected, no connection


Solution:-
Here is the solution to fix metasploit failed to connect to the database.
root@kali:~# /usr/bin/msfconsole
msf > msfdb init
[*] exec: msfdb init
msf > msfconsole
[*] exec: msfconsole
msf > db_status
[*] postgresql connected to msf
              [OR]
root@kali:~# /usr/bin/msfconsole start
msf > db_status
[*] postgresql connected to msf
I hope this information is useful for you. Please forgive any typos or incomplete sentences.
Share:

Saturday, September 10, 2016

Configure IE11 Proxy Settings Via Group Policy in Windows 2012 R2

This tutorial describes How to Configure Proxy Settings in Internet Explorer 11 via group policy.

My Scenario:-
I've recently updated IE9 to IE11 to users. One day our proxy server went down. So i changed the redundant proxy server IP Address from group policy in Windows 2008R2 but proxy settings are not applied to IE11 Users. I google and found IE11 proxy settings will not applied from Internet Explorer Maintenance (IEM) anymore.
Solution:-
Screenshot are taken from the LAB environment using windows 2012R2 for Security reason.
Step#1  Run==>gpmc.msc

Step#2 Create a new policy for IE11


Step#3 Edit the newly created IE11 policy using group policy management editor


User Configuration==>Policies==>Windows Settings==>Registry (Edit Registry)

Add new Registry

Add the following registry's

1#ProxyEnable
Keypath:Software\Microsoft\Windows\CurrentVersion\Internet Settings
Default:ProxyEnable
Value type: REG_DWORD
Value_Data: 00000001
Base: Hexadecimal

2#ProxyServer
Keypath:Software\Microsoft\Windows\CurrentVersion\Internet Settings
Default:ProxyServer
Value type: REG_SZ
Value_Data: 172.19.120.12:3128

3#ProxyOverride
Keypath:Software\Microsoft\Windows\CurrentVersion\Internet Settings
Default:ProxyOverride
Value type: REG_SZ
Value_Data: hrms;172.19.120.11<local>

4# Gray out Proxy, User can not change proxy settings
Keypath:Software\Policies\Microsoft\Internet Explorer\Control Panel\
Default:Proxy
Value type: REG_DWORD
Value_Data: 1
Base: Decimal
Step#4 Now Link our IE11 Policy into respective OU


Step#5 Logoff and logon Clients or Update group policy in client machine using Run==>gpupdate /force

I hope you this information is useful for you. Please forgive any typos or incomplete sentences.
Share:

Friday, September 2, 2016

How to configure the Logon Banner on Domain Computers by using Group Policy

This tutorial describes How to configure the Logon Banner on Domain Computers by using Group Policy in windows 2012R2

Step #1
gpmc.msc
Run==>CMD==>gpmc.msc
Step #2
Create logon banner in windows 2012R2

In Group Policy Objects==>New==>Name"Logon Banner"==> Press Ok==>Logon Banner==>Edit
Step #3
Create new GPO

Group Policy Management Editor==> Click on Computer Configuration, expand Policies, expand Windows Settings, expand Security Settings, expand Local Policies, expand Security Options
 Edit logon banner policy


Edit logon banner policy


On the Right Pane find the Policy==>Interactive logon: Message text for users attempting to log on.
In "Security Policy Settings"  Tab => Tick the "Define this policy settings in the template"==> Type Your Legal message content
Interactive logon Message text for users attempting to log on

Message in Message Box==>Press Ok
Then we need to provide TITLE for Example "WARNING!!!     TECHLANDA."
Interactive logon: Message title for users attempting to log on==>In "Security Policy Settings"  Tab => Tick the "Define this policy settings in the template"==> Your TITLE GOES HERE==>Press Ok
Interactive logon Message title for users attempting to log on

Step #4
Now we are going to Link our Logon Banner Policy.
Right Click on Domain Name "Techlanda.com" ==>Link an Existing GPO...==>GPO Wizard, in group policy objects, Select Logon Banner==> Press ok

Link an Existing GPO
Select Existing GPO

Added Existing GPO


Step # 5
Restart the client machine to Apply changes
Windows logon banner

I hope this information is useful for you. Please forgive any typos or incomplete sentences.
Share:

Thursday, August 25, 2016

Cisco webex recorder is not opening in windows 7

This tutorial describes How to fix Cisco WebEx recorder is not opening in windows 7.

My Scenario:-
We are using Cisco WebEX recorder to capture the Screen. Its not using frequently when ever their is a need they capture desktop screen and review it later. I received call a from a user that Cisco Webex recorder app is not opening but the player is functioning fine.

Troubleshooting:-
Uninstall and reinstall the Cisco WebEx Program still same issue persist.
I realized that their is a problem with recent windows patches applied in the user machine.

Solution:-
After uninstall Windows Update KB3164035 Cisco WebEx recorder is open like a charm
For more information Visit Microsoft KB Portal

I hope this information is useful for you. Please forgive any typos or incomplete sentences.
Share:

Monday, August 22, 2016

Error: No suitable device found: no device found for connection

This tutorial describes How to fix Bringing up interface eth0:  Error: No suitable device found: no device found for connection 'System eth0'.


My Scenario:-

I Successfully converted my Linux Centos 6.5 physical box into virtual environment using VMware VCenter Converter standalone. After the P2V conversion all the services are running perfectly except network adapter eth0 is not started. I realized there is some problem with network adapter.  Identified eth0 retain physical server MAC address that is the cause of the error[Error: No suitable device found: no device found for connection 'System eth0'.].

Error:-
no device found for connection System eth0
 [root@server1 ~]# service network restart
Shutting down loopback interface:                          [  OK  ]
Bringing up loopback interface:                            [  OK  ]
Bringing up interface Auto_Ethernet:  Active connection state: activated
Active connection path: /org/freedesktop/NetworkManager/ActiveConnection/1
                                                           [  OK  ]
Bringing up interface eth0:  Error: No suitable device found: no device found for connection 'System eth0'.
                                                           [FAILED]
Solution:-

Replace the Virtual machine MAC Address to fix Bringing up interface eth0:  Error: No suitable device found: no device found for connection 'System eth0'.

Physical server MAC:- 00:0C:29:4E:8D:DD
Virtual server MAC:-  00:0C:29:D0:C9:FE

Step #1: Command to find Physical sever MAC address:-
[root@server1 ~]# cat /etc/sysconfig/network-scripts/ifcfg-eth0
Step #2: Command to find current Virtual server MAC address:-
[root@server1 ~]# ifconfig
 
Step #3: Command to replace the MAC address
[root@server1 ~]#sed -i "s/00:0C:29:4E:8D:DD/00:0C:29:D0:C9:FE/g" /etc/sysconfig/network-scripts/ifcfg-eth0
                                                [OR]

Manually replace the MAC address In line HWADDR replace a Virutal MAC address
[root@server1 ~]#vi /etc/sysconfig/network-scripts/ifcfg-eth0
 Before changes eth0:-

    DEVICE=eth0
    TYPE=Ethernet
    UUID=20bc39e1-d299-4a98-a4a2-4c1500c583ef
    ONBOOT=yes
    NM_CONTROLLED=yes
    BOOTPROTO=none
    IPADDR=x.x.x.x
    PREFIX=24
    GATEWAY=x.x.x.x
    DNS1=8.8.8.8
    DEFROUTE=yes
    IPV4_FAILURE_FATAL=yes
    IPV6INIT=no
    NAME="System eth0"
    HWADDR=00:0C:29:4E:8D:DD
    LAST_CONNECT=1453452600
    DNS2=8.8.4.4
    USERCTL=no

After changes eth0:-

    DEVICE=eth0
    TYPE=Ethernet
    UUID=20bc39e1-d299-4a98-a4a2-4c1500c583ef
    ONBOOT=yes
    NM_CONTROLLED=yes
    BOOTPROTO=none
    IPADDR=x.x.x.x
    PREFIX=24
    GATEWAY=x.x.x.x
    DNS1=8.8.8.8
    DEFROUTE=yes
    IPV4_FAILURE_FATAL=yes
    IPV6INIT=no
    NAME="System eth0"
    HWADDR=00:0C:29:D0:C9:FE
    LAST_CONNECT=1453452600
    DNS2=8.8.4.4
    USERCTL=no

Press ESC[Character] and then type :wq! to apply changes or Abort :q!

Step #4: Restart the Linux box and restart the network service to apply changes.
[root@server1~]# init 6
[root@server1~]# service network restart
Still if your facing the issue. Change the NM_CONTROLLED yes to no in eth0. Restart the Linux box and restart the network service. once everything is back to normal change the NM_CONTROLLED no to yes and Restart the Linux box and restart the network service.
service network restart
I hope this information is useful for you. Please forgive any typos or incomplete sentences.
Share:

Contributors

Popular Posts